

Last Updated on August 26, 2026 by Caleb Warren
On most electric kick scooters, the drive motor is built into the hub of the front wheel, rear wheel, or both wheels on a dual-motor model. The easiest way to find it is to look for a thicker wheel hub with a power cable entering near the axle. Before removing covers or disconnecting wiring, identify your exact scooter model and check its official service instructions because controller locations, fasteners, axle hardware, connectors, and torque specifications vary widely.
Quick Answer
The motor on most electric kick scooters is inside the hub of the front or rear wheel. Dual-motor scooters have a motor in each wheel. Look for a large hub and a cable entering the axle. Do not assume the controller or motor connectors are in the stem; their locations and removal procedures depend on the model.
Key Takeaways
- Most stand-up electric scooters use a hub motor in the front wheel, rear wheel, or both wheels.
- A cable entering the wheel near the axle is one of the clearest signs that the wheel contains a hub motor.
- Controller, battery, brake, and wiring layouts are model-specific, so generic screw counts and connector locations should not be trusted.
- Power the scooter down, unplug the charger, and follow the manufacturer’s battery-isolation procedure before disconnecting motor wiring.
- Before replacing a motor, match the wheel size, voltage, axle, brake layout, wiring, hall sensors, connector type, and controller compatibility.
At a Glance
| Time Required | 5–10 minutes to identify the motor; considerably longer for removal or replacement, depending on the model |
| Difficulty | Easy for identification; intermediate to advanced for motor removal |
| Tools Needed | Exact tools listed in your model’s service guide; commonly hex/Torx drivers, wrenches, cable labels, and a torque wrench |
| Cost | Visual inspection costs nothing; replacement-motor cost varies substantially by scooter model and wheel assembly |
Warning: Never service a scooter while it is charging. Power it off, unplug the charger, and follow the manufacturer’s procedure for isolating the battery before unplugging high-current connectors. Do not open, rebuild, puncture, or modify a lithium-ion battery pack. Stop if you find melted connectors, burned insulation, swelling, severe corrosion, or other heat damage.
Disclosure: As an Amazon Associate I earn from qualifying purchases. Some links on this page are affiliate links, at no extra cost to you.
Where to Find Your Scooter Motor
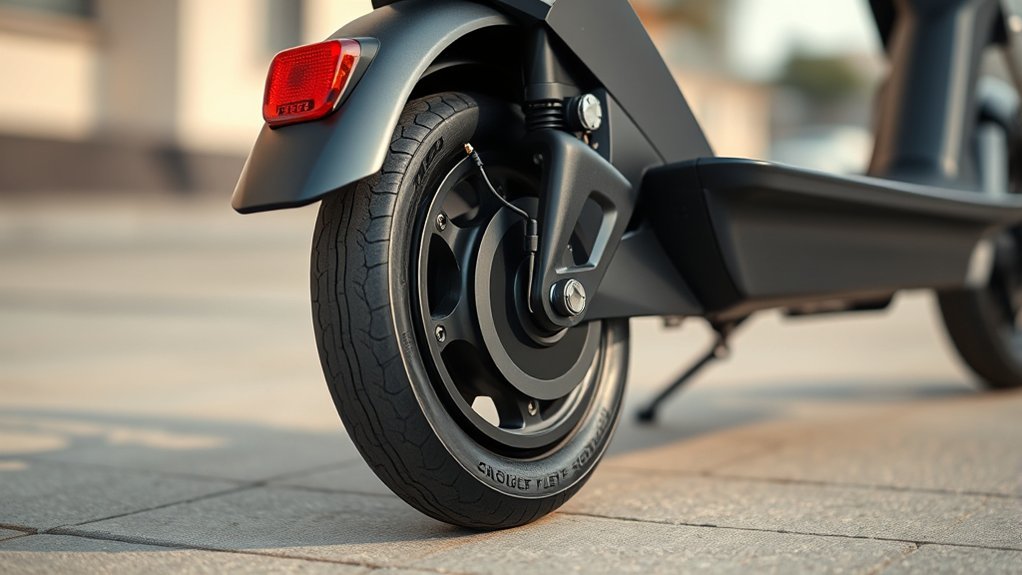
Your scooter’s motor is most likely inside one of its wheel hubs. Some scooters are front-wheel drive, some are rear-wheel drive, and higher-performance models may have a hub motor in both wheels. For example, the Segway Ninebot E2 E is specified as front-wheel drive, while the NIU KQi1 Sport uses a rear-wheel-drive motor.
You can usually identify the driven wheel without removing anything. Compare the two hubs. The motorized wheel normally has a larger enclosed center section and an electrical cable entering near the axle. A non-powered wheel usually lacks this heavy motor cable, although it may still have a brake disc, drum, speed sensor, or other hardware.
If both wheels have substantial electrical cables entering their axles, you may have a dual-motor scooter. Verify this in the owner’s manual or specifications before ordering parts.
Pro Tip: Find the model number or serial label before opening the scooter. Manufacturer diagrams and official self-repair instructions are far more reliable than assuming another scooter with a similar-looking frame uses the same fasteners or wiring.
Hub Motor vs Mid-Drive Motor
A hub motor is integrated into the wheel itself. This is the normal arrangement on many electric kick scooters because it eliminates a separate chain or belt between the motor and wheel. The motor can be mounted in the front wheel, rear wheel, or both wheels.
A true mid-drive or chassis-mounted motor sits away from the wheel and transfers power through a belt, chain, gearbox, or other mechanical drive. This layout is much less common on ordinary stand-up commuter scooters. Unlike an electric bicycle, a kick scooter has no pedal crank, so descriptions such as “motor near the crank” do not apply.
| Layout | Where the Motor Sits | How to Recognize It |
|---|---|---|
| Front hub | Inside front wheel | Motor cable enters front axle |
| Rear hub | Inside rear wheel | Motor cable enters rear axle |
| Dual hub | Inside both wheels | Heavy motor wiring at both axles |
| Chassis/mid-drive | Inside or near the main frame | Separate belt, chain, gear, or shaft transfers power to a wheel |
Do not choose a scooter or replacement motor only by assumptions about “hub torque” or “mid-drive torque.” Acceleration and hill performance also depend on controller current, battery voltage, motor design, gearing where applicable, wheel diameter, rider weight, firmware, temperature, and the manufacturer’s power limits.
How to Identify Your Motor Type
Start with a visual inspection while the scooter is powered off. Look at each wheel hub and follow any cable that exits near the axle. A thick cable running from the wheel into the frame is a strong sign of a hub motor because it carries motor power and, on many brushless motors, sensor wiring.
Many current electric scooters use brushless motors. For example, Xiaomi describes current models such as the Electric Scooter 5 Pro as using a rear-wheel-drive brushless motor. However, do not identify your motor solely by appearance or by a generic wattage range. Check the manufacturer’s specification for the exact rated power, maximum power, voltage, and drive layout.
If the scooter has two motorized hubs, check whether its controls allow single- and dual-motor operation. If neither wheel contains the main motor assembly, consult the service documentation before opening the chassis because you may have an uncommon belt-, chain-, or gearbox-driven design.
What’s Under the Stem Cover
Do not assume the motor controller is under the stem cover. Depending on the scooter, the stem may contain dashboard wiring, a communication cable, lights, switches, or other harnesses, while the controller and battery may be located elsewhere in the chassis.
Current manufacturers publish different controller and hub-motor procedures for different models. Segway, for example, provides model-specific controller and hub-motor self-repair resources rather than one universal removal procedure. Use the service documentation for your exact model before removing a stem, deck, or controller cover.
- Power the scooter off and unplug the charger.
- Identify the exact model and open its official service instructions.
- Follow the stated battery-isolation procedure before disconnecting internal power wiring.
- Photograph and label connector locations before separating them.
- Keep gaskets, wire guides, strain reliefs, and seals in their original positions.
Never substitute a generic screw count, such as “six T25 screws,” for the instructions that apply to your scooter. Using the wrong driver or reinstalling a fastener at the wrong torque can damage threads, covers, folding structures, or waterproof seals.
How to Remove the Fender
Some motor replacements require fender removal, but others do not. First confirm whether the fender blocks the axle, connector path, brake hardware, or motor cable on your model.
| Step | Action |
|---|---|
| 1 | Support the scooter so the wheel cannot fall when axle hardware is loosened |
| 2 | Remove only the fender fasteners specified in the service guide |
| 3 | Disconnect a fender light connector if the manufacturer requires it |
| 4 | Move the fender clear without stretching or pinching any cable |
Avoid prying painted plastic aggressively or cutting around wiring with a razor blade. If adhesive, clips, or cable retainers are present, use the manufacturer’s recommended removal method. Keep every washer, spacer, bracket, and fastener organized by location so it returns to the same position during reassembly.
How to Disconnect Motor Wiring
A brushless scooter motor may use several heavy phase conductors plus a smaller sensor or communication connector, or it may use a combined proprietary plug. Connector design varies significantly.
Before disconnecting anything, make sure the charger is unplugged, the scooter is powered down, and the manufacturer’s service procedure has been followed for battery isolation. Do not assume the power button alone physically isolates every internal circuit.
- Expose the motor wiring using the model-specific service procedure.
- Photograph the original cable routing and connector orientation.
- Label similar-looking plugs before separating them.
- Release connector locks or clips rather than pulling on the wires.
- Pull connectors apart by their housings and keep water seals clean.
Do not cut zip ties until you know which ones are intended to be replaced and what cable clearance they maintain. Never cut into insulation, molded connector boots, or factory sealing material.
Note: A melted motor connector, blackened terminal, burned smell, or brittle insulation is more than a routing problem. Stop using the scooter until the cause of overheating or excessive resistance has been diagnosed.
How to Remove the Scooter Motor
On a hub-motor scooter, replacing the motor often means removing the complete motorized wheel or wheel-hub assembly. The precise process depends on whether that wheel also carries a disc rotor, drum brake, tire valve, suspension hardware, axle spacers, torque washers, or other model-specific parts.
| Step | Action |
|---|---|
| 1 | Confirm the replacement procedure and required tools for the exact scooter model |
| 2 | Power down, unplug the charger, and isolate the battery as instructed by the manufacturer |
| 3 | Disconnect and free the motor cable without damaging its strain relief |
| 4 | Remove brake or fender hardware only where required |
| 5 | Support the wheel and remove its axle-retention hardware in the documented order |
| 6 | Withdraw the motorized wheel while preserving spacers, washers, and cable orientation |
Do not hammer the axle, twist the motor cable, or let the wheel hang from its wiring. Some hub motors are sealed assemblies and are replaced as a complete unit rather than opened internally.
Check Compatibility Before Installing a Replacement
A motor that physically fits is not automatically electrically compatible. Verify the replacement against the original part number or manufacturer specification. Important checks include:
- front, rear, or dual-motor position;
- wheel and tire size;
- nominal system voltage;
- motor rated and maximum power;
- axle diameter, flats, width, and washer arrangement;
- disc, drum, or electronic-brake configuration;
- phase-wire and hall-sensor arrangement;
- connector style and pinout;
- controller current and firmware compatibility;
- cable exit direction and strain-relief position.
Installing a higher-wattage motor without verifying the controller, battery, wiring, connectors, braking system, and firmware can create reliability or safety problems rather than a useful performance upgrade.
How to Handle the Brake Line
First identify what you are looking at. A mechanical brake cable, hydraulic brake hose, brake-lever electrical wire, tail-light cable, and motor cable are different components even when they run beside one another.
Do not route a physical brake cable or hose to the rear fender merely to make a tail light work. On scooters with a brake light, an electrical brake switch or electronic control system can signal the light. Preserve each cable’s original routing and follow the manufacturer’s wiring diagram.
Preserve Existing Brake Line
If the motor replacement does not require brake-line removal, leave the brake cable or hydraulic hose in place. Avoid sharp bends, kinks, twists, crushing, and unnecessary disconnection. Hydraulic brake hoses should not be opened unless you are prepared to perform the manufacturer’s required bleeding and leak checks.
- Photograph the original brake-line route.
- Release only the clips or guides necessary for access.
- Support the line so it is not carrying the weight of a wheel or caliper.
- Return every guide and protective sleeve to its original position.
- Perform a full brake-function check before riding.
Remove Shrink Wrap Carefully
Do not automatically cut factory heat-shrink or sealed harness protection. It may provide insulation, strain relief, abrasion protection, or water resistance. Remove it only if the manufacturer’s service procedure specifically requires access beneath it.
If approved service instructions call for removing a replaceable outer sleeve, keep any cutting edge pointed away from the conductor and connector underneath. Stop immediately if you cannot clearly separate the protective layer from the cable insulation.
Route Line Through Spring
Some scooters use a spring-shaped protective sleeve or strain relief around a cable near a moving joint or axle. If your scooter has one, route the same cable through it exactly as shown in the service documentation.
- Match the original cable path before inserting the wheel.
- Keep the cable free of kinks and sharp edges.
- Leave enough movement for steering or suspension where required.
- Keep the cable away from the tire, brake rotor, and other moving parts.
- Confirm that no cable becomes tight at full steering or suspension travel.
How to Reinstall the Motor and Fender
Reinstallation should reproduce the original axle orientation, washers, spacers, cable exit direction, brake alignment, and cable routing. Do not invent a torque value: use the manufacturer’s specification for your exact scooter and fastener.
Motor Line Routing
Route the motor cable along its original path before fully tightening the wheel or surrounding covers. The cable should not rub the tire, cross a brake rotor, become trapped beneath an axle washer, or be stretched when the handlebars turn.
- Position the motorized wheel in the correct direction.
- Reinstall the original spacers, keyed or torque washers, and axle hardware in the documented order.
- Place the motor cable in its original guide or strain relief.
- Reconnect motor plugs only after checking their orientation and seals.
- Secure the harness with the specified clips or replacement cable ties.
Avoid using electrical tape as a substitute for a damaged connector seal, grommet, strain relief, or waterproof boot. Replace damaged protective components with the correct parts.
Fender and Brake Line
Before reinstalling the fender, check every cable around the wheel. The fender must not force the motor cable, brake cable or hose, light wiring, or sensor wiring into the tire or other moving components.
| Check | Action | Expected Result |
|---|---|---|
| Motor cable | Follow original guides and axle exit | No twisting or rubbing |
| Brake cable/hose | Keep original bend radius and clips | Free brake movement |
| Light wiring | Reconnect only to its matching electrical connector | Lights operate normally |
| Fender | Secure with correct fasteners | No contact with tire |
| Wheel | Rotate by hand before powering on | Adequate clearance with no binding |
Reassembly and Securing
Reinstall covers, cable guides, axle hardware, fenders, brake components, and connectors according to the service manual. If a gasket or seal was disturbed, make sure it is clean, undamaged, and seated correctly before closing the enclosure.
- Check that every connector is fully seated and locked.
- Confirm that no wire is trapped beneath a cover or fastener.
- Torque safety-critical fasteners to the manufacturer’s specification.
- Spin the repaired wheel by hand and check for rubbing or abnormal resistance.
- Test the brake before powering the scooter.
- Power on with the driven wheel safely off the ground if the manufacturer’s procedure allows it.
- Check for error codes, abnormal noise, vibration, or unexpected wheel movement.
- Perform the first riding test at very low speed in a safe area.
How to Tell Whether the Motor Is Actually the Problem
A scooter that will not drive does not automatically need a new motor. The battery, controller, throttle, brake cut-off circuit, connectors, hall sensors, wiring, firmware, or motor itself can produce similar symptoms.
| Symptom | Possible Causes | First Checks |
|---|---|---|
| Motor does nothing | Battery/power issue, controller, brake cut-off, connector, motor | Check dashboard errors, battery state, visible connectors, and official diagnostic guidance |
| Motor jerks or stutters | Phase connection, hall sensor, controller, motor winding | Stop riding and inspect connectors for looseness, heat, corrosion, or damage |
| Weak acceleration | Low battery, thermal limiting, controller limit, tire/brake drag, motor fault | Check battery state, wheel rotation, brakes, error codes, and temperature |
| Grinding or scraping | Bearing, brake, tire/fender contact, internal motor damage | Spin the wheel by hand with power off and locate the mechanical noise |
| Motor gets unusually hot | Heavy load, hill climbing, brake drag, electrical fault, damaged motor | Stop riding, allow it to cool, and investigate before continuing |
Some hub motors become hot during normal operation. Segway’s KickScooter documentation warns users not to touch a hub motor immediately after riding because it can be hot. Persistent overheating, a burning smell, melted connectors, or sudden performance loss requires diagnosis before further use.
When to Use Professional Repair
DIY inspection is reasonable for owners who can follow the manufacturer’s service procedure and work safely with mechanical and electrical components. Professional or authorized service is the better choice when the repair involves a damaged lithium-ion battery, melted high-current wiring, an unknown connector pinout, hydraulic brake work you cannot bleed correctly, a sealed motor that is not intended to be opened, structural damage, or a repair that requires diagnostic equipment you do not have.
The U.S. Consumer Product Safety Commission advises consumers to follow manufacturer directions for micromobility devices and to use replacement battery packs that have been tested and approved for the device. Its broader guidance also recommends inspecting brakes, tires, cables, frame components, lights, and controls for damage before riding.
Frequently Asked Questions
Can I Fix My Electric Scooter Myself?
You can handle some inspections and model-approved repairs yourself if you have the correct tools and official service instructions. Motor replacement is more involved because it may require electrical isolation, brake work, axle removal, connector handling, and precise reassembly. Do not open or rebuild the lithium-ion battery pack yourself.
What Are the Most Common Electrical Causes of Motor Problems?
Common possibilities include loose or overheated connectors, damaged motor wiring, hall-sensor faults, controller problems, battery or power-delivery problems, and internal motor faults. Similar symptoms can come from several components, so diagnose the system before buying a motor.
How Do I Tell if an Electric Scooter Motor Is Bad?
Possible signs include persistent stuttering, abnormal grinding, repeated motor-related error codes, damaged or burned wiring, excessive heat, or failure to turn after the battery, controller, brake cut-off, connectors, and related wiring have been checked. Do not diagnose the motor from weak acceleration alone.
Is It Worth Fixing an Electric Scooter?
It can be worthwhile when the frame, battery, brakes, and electronics are otherwise in good condition and the correct replacement parts remain available. Compare the total repair cost with the scooter’s current value and consider whether other major components are also approaching replacement.
Is the Electric Scooter Motor in the Front or Rear Wheel?
Either arrangement is possible. Some scooters are front-wheel drive, others are rear-wheel drive, and dual-motor scooters have motors in both wheels. Look for the motor cable entering the wheel axle and confirm the layout in the manufacturer’s specifications.
Where Is the Motor Controller on an Electric Scooter?
There is no universal location. The controller may be inside the deck, stem area, chassis, or another protected enclosure depending on the design. Use your model’s service diagram rather than opening covers based on another scooter’s layout.
Can I Replace My Scooter Motor With a Higher-Wattage Motor?
Not safely based on wattage alone. The battery voltage, controller current, connectors, wiring, axle, wheel size, brakes, firmware, and thermal limits must all be compatible. The safest replacement is the manufacturer-approved motor or a part confirmed to match the original system.
What Should I Check Before Riding After a Motor Repair?
Check axle security, wheel alignment, brake operation, tire clearance, cable routing, connector locks, lights, error codes, and unusual noises. Spin the wheel by hand first, then perform any manufacturer-recommended powered test and finish with a low-speed test in a safe area.
Conclusion
On most electric kick scooters, the motor is easy to locate once you know what to look for: find the wheel with the larger hub and an electrical cable entering near the axle. That may be the front wheel, rear wheel, or both wheels on a dual-motor scooter.
Finding the motor is the easy part. Removing or replacing it should be treated as a model-specific repair. Do not rely on universal screw sizes, assume the controller is in the stem, or confuse brake hardware with tail-light wiring. Identify the exact scooter, follow its service documentation, isolate electrical power correctly, preserve the original cable and washer arrangement, and test the wheel and brakes carefully before riding again.
Sources
- U.S. Consumer Product Safety Commission — Micromobility Information Center — manufacturer instructions, inspection, charging, battery, and replacement-component safety guidance.
- U.S. Consumer Product Safety Commission — Micromobility Safety Standards — UL 2272 and electrical-system safety background.
- Segway Ninebot E2 E Specifications — example of a front-wheel-drive hub-motor electric kick scooter.
- NIU KQi1 Sport Specifications — example of a rear-wheel-drive electric kick scooter.
- Xiaomi Electric Scooter 5 Pro Specifications — rear-wheel-drive brushless motor, braking, and brake-light information.
