
Last Updated on September 10, 2026 by Daniel Globe
Packing a hiking backpack well is about more than making everything fit. The goal is to keep the load stable, protect essential gear, place frequently used items within reach, and move the heaviest items close to your body. The right setup can reduce shoulder strain, improve balance, and make both short hikes and multi-day trips more comfortable.
Quick Answer
Pack light, bulky gear at the bottom; place dense items such as food, water, and cooking gear close to your back around the middle or upper-middle of the pack; and keep rain gear, snacks, navigation tools, first aid supplies, and other frequently used items near the top or in accessible pockets.
Key Takeaways
- Choose a backpack that matches your torso, hip size, trip length, and the volume of gear you actually need.
- Pack light, bulky gear low and keep the heaviest items close to your spine rather than at the bottom of the pack.
- Keep navigation tools, water, snacks, rain gear, first aid supplies, and other frequently used items easy to reach.
- Carry the Ten Essentials and adjust food, water, clothing, and shelter to the route, forecast, season, and trip length.
- Tighten the hipbelt first, then shoulder straps, load lifters, and sternum strap so the pack stays stable without restricting movement or breathing.
At a Glance
| Time Required | About 15–30 minutes once your gear is gathered |
| Difficulty | Easy |
| Tools Needed | Backpack, required hiking gear, pack liner or dry bags; luggage or kitchen scale optional |
| Cost | $0 if you already own the needed gear; otherwise varies by trip and equipment |
Choose the Right Hiking Backpack
Selecting the appropriate backpack is the first step. Capacity should match the length of the trip, weather, food requirements, and how compact your equipment is rather than an arbitrary number.
As a general starting point, manufacturer guidance commonly places short hikes and day trips around 18–30 liters, overnight or weekend loads around 35–50 liters, and longer backpacking trips around 50–75 liters or more. Winter equipment, group gear, bear-resistant food containers, or bulky older equipment may require additional space. See Gregory’s current pack-selection guidance for representative capacity ranges.
A larger pack is not automatically better. Extra unused volume can encourage overpacking and may allow the load to shift. Before choosing a pack, lay out the equipment you expect to carry and select enough volume for those items plus required food, water, and weather protection.
Products Worth Considering
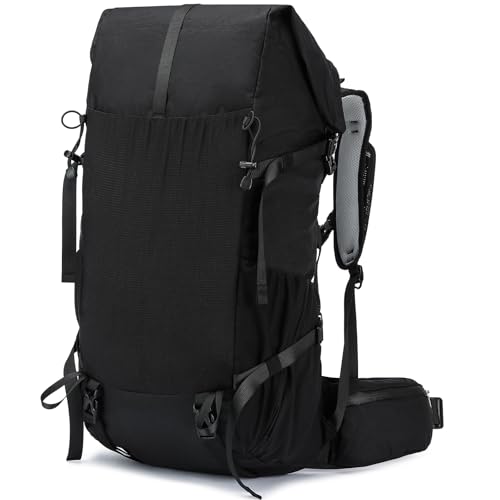
【Large Capacity & Multiple Compartment】The 40L to 50L large capacity camping hiking backpack can accommodate travel equipment for 1-2 people. The main bag can accommodate clothes, sleeping bags, and travel supplies; The external suspension system can be used to attach hiking equipment such as tents, picnic mats, and trekking poles; Two side pockets that can carry additional water bottles. Convenient and practical.

High-Quality Material:Hiking backpack is made of high quality rip-stop 210d nylon fabric,which is water resistant,tear resistant,anti-scratch and wear resistant. Furthermore,we also give away a rain cover with a clear silver reflective logo. It is putted in the little pocket under the backpack. So it is no doubt that all your things will keep dry during rain. Just take this outdoor backpack,no matter the weather.

NOT YOUR BASIC BACKPACK: Feature rich at this price point; Comfort and balanced backpack for men and women.
Fit the Backpack to Your Torso and Hips
Fit matters as much as capacity. Backpack size is based primarily on torso length rather than overall height. The hipbelt should wrap securely around the top of your hip bones so your hips carry much of the load while the shoulder straps stabilize the pack.
Look for an adjustable suspension, padded hipbelt, comfortable shoulder harness, sternum strap, and load lifters when the pack size and expected load call for them. Try the backpack with realistic weight inside before deciding whether it fits.
Pro Tip: Do not judge a backpack while it is empty. Load it with the approximate weight and volume you expect to carry, adjust every strap, and walk around for several minutes. Pressure points are much easier to notice before you reach the trail.
Organizing Your Gear and Essentials
Once you have selected the right backpack, organize your equipment before loading it. Group similar items so you can find them without emptying the entire pack. Useful categories include clothing, sleep equipment, cooking supplies, food, first aid, navigation, hygiene items, and emergency equipment.
Packing cubes, stuff sacks, and dry bags can help, but do not use so many containers that they add unnecessary weight or make equipment harder to identify. A waterproof pack liner is another simple way to protect clothing and sleeping equipment from rain.
Keep items you may need while walking in predictable locations. Snacks, a map, sunscreen, water, rain gear, gloves, a headlamp, and a small first aid kit are usually better near the top or in accessible pockets than buried underneath camp equipment.
How to Pack a Hiking Backpack Step by Step
- Line the pack if rain is possible. Use a waterproof pack liner or waterproof stuff sacks for gear that must remain dry.
- Put light, bulky gear at the bottom. For overnight trips, this is usually the sleeping bag, sleep clothing, and other compressible items you will not need until camp.
- Build the heavy core close to your back. Place dense gear such as food, water, a stove, fuel, or a bear canister near your spine in the middle to upper-middle portion of the pack.
- Fill gaps with medium-weight items. Clothing, a tent body, and similar gear can stabilize the dense core and prevent movement.
- Keep trail essentials near the top. Rain gear, insulation, first aid supplies, water treatment, and items you may need quickly should not be trapped beneath camp gear.
- Use pockets deliberately. Side and hipbelt pockets work well for water, snacks, sunscreen, a phone, or other light items you reach for often. Balance left and right pockets so one side is not noticeably heavier.
- Compress and secure the load. Tighten compression straps enough to stop the contents from shifting. Avoid dangling equipment that can snag vegetation or swing as you walk.
- Put the pack on and adjust the harness. Tighten the hipbelt first, followed by the shoulder straps, load lifters if fitted, and the sternum strap.
Backpack manufacturer Deuter recommends keeping the heaviest part of a normal hiking load close to the body and near shoulder height, with light items such as a sleeping bag at the bottom. On difficult alpine or climbing terrain, lowering the densest part of the load somewhat can improve stability. See Deuter’s backpack-packing guidance.
Packing for Different Types of Hikes
Short Day Hikes
For a short day hike on a familiar trail, keep the load compact but do not strip out emergency equipment simply because the trip is short. Carry appropriate food, water, navigation, weather protection, illumination, first aid supplies, and the other essentials needed for the route.
A smaller daypack is often enough when conditions are mild and the trail is close to services, but a longer day, cold weather, desert heat, or a remote route may require considerably more equipment.
Overnight and Multi-Day Hikes
Longer trips require shelter, sleep equipment, additional food, cooking equipment when applicable, more clothing, and a plan for water treatment. Lightweight and compact equipment can reduce required pack volume, but do not save weight by removing equipment needed for realistic hazards.
Organizing food into daily meals can make resupply and camp routines simpler. Keep emergency food separate enough that you do not accidentally eat it early in the trip.
Cold, Wet, or Variable Weather
Cold and wet conditions increase pack volume because you may need insulation, gloves, rain protection, dry sleeping layers, and a warmer sleep system. Protect insulation from water with a pack liner or waterproof storage rather than relying only on the backpack’s exterior fabric.
Hot or Exposed Routes
Hot, dry, or exposed hikes may shift more of your load toward water, electrolytes, sun protection, and heat-management gear. Research reliable water availability before leaving rather than assuming a stream, spring, or tap will be usable.
Distributing Weight and Balancing Your Backpack
| Backpack Weight Distribution | Why It Matters |
| Balance the left and right sides | Prevents the pack from constantly pulling your torso to one side |
| Keep dense gear close to your back | Keeps the center of mass closer to your body and reduces backward pull |
| Use the hipbelt to support the load | Transfers much of the load away from the shoulders |
| Adjust shoulder, load-lifter, and sternum straps | Stabilizes the backpack without unnecessarily squeezing the shoulders or chest |
Weight distribution strongly affects stability. On normal hiking terrain, keep heavy equipment centered close to your back rather than letting it settle at the bottom or hang away from your spine. Light, compressible equipment belongs farther from your back or lower in the pack.
Water can be one of the densest things you carry, so avoid loading several heavy bottles into one side pocket. A hydration reservoir naturally keeps water close to the back, while bottles should be distributed as evenly as practical.
Adjust the Backpack in the Right Order
- Loosen the major straps before putting the loaded pack on.
- Position and tighten the hipbelt around the top of your hip bones.
- Tighten the shoulder straps until they follow your shoulders comfortably without taking the entire load.
- Snug the load lifters, if fitted, enough to bring the upper pack closer to your body.
- Buckle the sternum strap and tighten it only enough to stabilize the shoulder straps without restricting breathing.
Warning: Persistent numbness, sharp pain, severe pressure points, or restricted breathing are not signs that you simply need to “get used to” a backpack. Stop and readjust the load and harness. If the problem continues, the pack may be the wrong size or shape for you.
Maximizing Space and Efficiency
Use the interior volume efficiently without turning the backpack into a hard, overstuffed block. Socks, gloves, or other soft items can fill gaps around larger equipment. Compression sacks may reduce the volume of bulky items, but excessive compression can make gear difficult to pack into an efficient shape.
A modular system can simplify camp setup. For example, cooking equipment can stay together in one bag while clothing stays in another. When you stop, you can remove the group you need without unpacking everything else.
Keep the exterior of the backpack as clean as possible. Equipment hanging from straps can swing, snag vegetation, alter balance, get wet, or become lost. Secure trekking poles and other equipment to their intended attachment points when they are not in use.
Pro Tip: After packing, lift the backpack by its haul loop and gently move it from side to side. If you can feel a heavy object shifting inside, reopen the pack and stabilize that item before hiking.
Essential Items to Pack for Safety and Comfort
The National Park Service recommends carrying the Ten Essentials as a baseline and adding equipment required by the route, weather, activity, and duration of the trip. Review the National Park Service Ten Essentials before heading out.
- Navigation: map, compass, GPS device, or an appropriate combination—and the knowledge to use them.
- Sun protection: sunglasses, sunscreen, hat, and protective clothing as conditions require.
- Insulation: extra layers suitable for expected and unexpected weather.
- Illumination: headlamp or flashlight with sufficient power or spare batteries.
- First aid: supplies appropriate for the group plus necessary personal medications.
- Fire: an appropriate emergency fire-starting method where possession and use are legal and safe.
- Repair kit and tools: items appropriate for your gear, such as repair tape or a multi-tool where permitted.
- Nutrition: food for the planned outing plus an emergency reserve appropriate to the trip.
- Hydration: sufficient water and, when necessary, equipment to treat additional water.
- Emergency shelter: a tent, tarp, bivy, emergency blanket, or other protection appropriate to the trip.
A whistle is a useful signaling tool and weighs very little. A portable power bank can help keep a phone or GPS device charged, but electronics should not replace essential backup navigation, illumination, or emergency planning where failure would leave you without a safe alternative.
For overnight trips, a sleeping pad provides cushioning and insulation from the ground, while the sleeping bag or quilt should be appropriate for expected temperatures. Keep sleep insulation dry because its performance can drop sharply when wet.
Products Worth Considering

[Preparedness for the Unknown]: While no one can predict when or how severe a disaster or unexpected event will be, our 262pcs survival kit helps your family stay prepared during the critical first 72 hours. Designed for family use, it was developed in collaboration with survival experts, outdoor professionals, special forces operators, and mountain guides. Whether you're preparing for earthquakes, tornadoes, wildfires, or hurricanes, our survival kit provides peace of mind.

Security And Reliability - All of our first aid products carry certificate of conformity to ensure conformance to global standards wherever they are used.

COMPLETE 100-PIECE EMERGENCY KIT: Stay prepared for cuts, scrapes, burns, sprains, and outdoor emergencies with essential medical supplies packed into one compact first aid kit for home, travel, camping, hiking, and boating.
Tips for Packing Food and Water
Food should provide enough energy without taking unnecessary space. Nuts, dried fruit, bars, tortillas, nut or seed butters, and other calorie-dense foods work well for many hikers. Overnight hikers may also use dehydrated meals because they reduce carried water weight in the food itself when safe water is available at camp.
Pack food by meal or day when that makes camp routines easier. Remove unnecessary bulky packaging before the trip when regulations allow, but keep cooking instructions and ingredient or allergy information you may need.
Plan Water Around the Route
There is no single water quantity that fits every hike. Temperature, humidity, altitude, exertion, body size, trip duration, and water availability all change your needs. Research the route beforehand and carry enough capacity for dry stretches rather than relying on an assumed universal liters-per-hour rule.
A hydration reservoir allows hands-free drinking, while bottles are easier to inspect, measure, share, or refill. Either system can work well when packed securely.
Treat Backcountry Water Correctly
Never assume a clear mountain stream is safe. The CDC advises treating water when you are uncertain of its safety. Boiling is the most reliable way to kill disease-causing germs. When boiling is impractical, filtration followed by disinfection can provide broader protection because individual filters and chemical treatments do not necessarily remove or kill every type of pathogen. Follow the manufacturer’s directions for the exact treatment product you carry. See the CDC backcountry water-treatment guidance.
Note: Water treatment that kills microbes does not make water contaminated by harmful chemicals, toxins, or similar pollutants safe to drink. Use another water source when chemical contamination is possible.
Store Food Safely Around Wildlife
Do not rely on ordinary sealed packaging to protect food from wildlife. Rules vary by destination. Some areas require approved bear-resistant containers or food lockers, while others use different approved methods. Scented toiletries, trash, cookware, and other odorous items may also be covered by storage rules.
Check the land manager’s regulations before the trip. The National Park Service food-storage guidance explains why food and scented items must be secured and why requirements differ by park.
Warning: A zippered backpack, dry bag, food wrapper, or resealable plastic bag is not automatically a bear-resistant storage method. Carry the container or storage system required for the area you will visit.
Protect Your Gear From Rain and Moisture
Many backpacks resist light moisture, but seams, zippers, and prolonged rain can still allow water inside. Protect equipment that must remain dry—especially sleeping insulation and dry camp clothing—with a waterproof liner or individual dry bags.
A rain cover can keep much of the exterior dry, but it can shift in strong wind and does not completely seal every part of a pack. Internal waterproofing provides a useful second layer of protection.
Place the rain jacket where you can reach it before a storm arrives. Do not bury it underneath your sleeping bag or cooking equipment.
Products Worth Considering

STAY COVERED: If you're always waiting for the weather to clear, you won't get far. With the lightweight, stashable Pack Rain Cover, you can travel the miles while keeping the gear on your back bone-dry.

50L HIGH-CAPACITY: Include Main compartment, two zipped front pocket, sleeping bag compartment, mesh side pockets, you can put your tents, blanket,cooking gear and other equipment & accessories in this backpack, backpack internal layout clear classified easily, more convenience to you.

[Rain Cover for Backpack]: Don't let a drop of water in. It can resist water of 2000MPA hydraulic pressure rate. Strap around middle of bag is excellent feature to secure in wind, 1 storage bag for easy carrying out
Hygiene and Leave No Trace Packing
Personal hygiene items such as toilet paper, hand-cleaning supplies, and a small amount of soap may improve comfort on longer trips, but they must be used responsibly. Follow destination-specific waste rules.
National Park Service Leave No Trace guidance commonly directs visitors to pack out trash and hygiene products and, when washing is allowed, carry water away from lakes and streams before using a small amount of biodegradable soap. See the Grand Teton National Park Leave No Trace guidance for an example of these practices.
Common Backpack Packing Mistakes
- Putting the heaviest gear at the bottom: this can make a normal trail load pull backward and feel less stable.
- Loading one side more heavily: uneven water bottles or dense pockets can force your body to compensate all day.
- Burying frequently used equipment: rain gear, water treatment, first aid supplies, navigation tools, and snacks should be accessible.
- Attaching too much to the outside: dangling equipment can swing, snag, get wet, or fall off.
- Filling every empty space: unused capacity is not a reason to bring unnecessary gear.
- Skipping a test carry: a load that looks balanced on the floor may feel very different once you walk uphill.
- Depending entirely on a phone: battery loss, damage, cold temperatures, or lack of reception can make a phone unavailable when you need it.
- Ignoring destination regulations: permits, fire restrictions, food-storage rules, weather hazards, and trail closures can change what you must carry.
Final Checklist Before Hitting the Trail
Before leaving, compare everything in your backpack against your trip plan rather than simply asking whether the pack is full. The National Park Service recommends planning for the route, conditions, individual ability, food, water, emergency needs, and the Ten Essentials. Review current NPS Hike Smart guidance when preparing for a trip.
- Check the weather forecast and expected temperature range.
- Check trail alerts, closures, fire restrictions, water availability, and required permits.
- Confirm your map, route, turnaround points, and emergency options.
- Tell a responsible person where you are going and when you expect to return.
- Confirm that food and scented-item storage follows local wildlife regulations.
- Inspect water containers and treatment equipment.
- Verify that your first aid supplies and personal medications are complete.
- Make sure rain gear, insulation, navigation, snacks, and water are easy to reach.
- Close every compartment and secure loose straps or exterior equipment.
- Put the loaded backpack on and walk with it before leaving.
- Rebalance any item that shifts, pokes your back, or makes one side feel heavier.
- Adjust the hipbelt, shoulder straps, load lifters, and sternum strap one final time.
A backpack is packed well when the load stays close to your body, essential equipment is easy to reach, and you can walk without constantly fighting the pack’s weight.
If your hiking trip is in Bali, seasonal rainfall and heat can change how much water, rain protection, and dry clothing you need to carry. The site’s seasonal guide to the best time to travel to Bali can help you match your packing plan to typical travel conditions.
Frequently Asked Questions
What should I consider when packing my hiking backpack?
Consider trip length, terrain, weather, water availability, wildlife rules, emergency needs, and how often you will use each item. Carry the Ten Essentials, keep dense gear close to your back, and make frequently used equipment easy to reach.
How should I distribute the weight in my hiking backpack?
Balance the load from left to right. Put light, bulky gear near the bottom and keep dense items close to your spine around the middle or upper-middle of the pack for normal hiking. Avoid placing all heavy equipment at the bottom or far from your back.
What are some essential items to pack in my hiking backpack?
Use the Ten Essentials as a baseline: navigation, sun protection, insulation, illumination, first aid, fire, repair tools, nutrition, hydration and water treatment, and emergency shelter. Add route-specific items such as required wildlife food storage, medications, traction, insect protection, or additional water.
How can I ensure easy access to items in my hiking backpack?
Keep snacks, water, navigation tools, sunscreen, rain gear, a headlamp, and other regularly used equipment near the top, in hipbelt pockets, or in accessible exterior pockets. Camp-only gear can remain deeper inside the backpack.
What should I consider when packing for different weather conditions?
Check the forecast and prepare for realistic changes in temperature, precipitation, wind, and sun exposure. Wet or cold trips usually require more insulation and waterproof storage, while hot or exposed routes may require more water capacity and sun protection.
What should go at the bottom of a hiking backpack?
Put light, bulky items you will not need while walking at the bottom. On overnight trips, that commonly includes a sleeping bag, sleep clothing, or other compressible camp equipment. Avoid using the bottom as the default location for your densest gear.
How tight should backpack straps be?
The hipbelt should feel snug and supportive without pinching. Shoulder straps should follow your shoulders without carrying the entire load. Load lifters should gently bring the upper pack toward your body, and the sternum strap should stabilize the harness without restricting breathing.
Sources
- National Park Service — Ten Essentials — hiking preparedness and emergency equipment.
- National Park Service — Hike Smart — trip planning, equipment, food, water, and hiking safety.
- CDC — Water Treatment While Hiking, Camping, or Traveling — backcountry filtration, boiling, and disinfection guidance.
- National Park Service — Bear Safety: Storing Food — food, garbage, scented-item, and bear-resistant storage guidance.
- Deuter — How to Pack a Backpack — load placement, balance, and terrain-specific packing guidance.
- National Park Service — Leave No Trace at Grand Teton — waste disposal and backcountry washing practices.
