

Last Updated on September 10, 2026 by Daniel Globe
You’ll usually find the charging port on an electric scooter on the side or front area of the deck, near the base of the stem, beneath a protective cover, or on a removable battery pack. The exact location varies by model, so look for a rubber or plastic cap and check your scooter’s manual before connecting a charger. A plug that physically fits is not automatically safe or compatible.
Quick Answer
On most electric scooters, the charging port is on the side or front of the deck, near the base of the stem, under a protective cover, or on a removable battery. Look for a rubber or plastic cap and check the model manual before plugging anything in because port location and charger compatibility vary by model.
Key Takeaways
- Check the deck first, especially near the front wheel or where the deck meets the stem.
- Also inspect the lower stem, side panels, underside, and removable battery if your scooter has one.
- A rubber or plastic cover often hides and protects the charging socket.
- Use only the charger supplied with the scooter or one specifically approved by its manufacturer.
- Never charge when the port, charger, cable, or battery is wet or visibly damaged.
At a Glance
| Time Required | Usually a few minutes to locate the port; full charging time varies by scooter and battery. |
| Difficulty | Easy |
| Tools Needed | User manual or manufacturer support page; a flashlight can help with low-mounted ports. |
| Cost | No cost to locate the port; replacement chargers, covers, or damaged parts vary by model. |
Disclosure: As an Amazon Associate I earn from qualifying purchases. Some links on this page are affiliate links, at no extra cost to you.
Where Is the Charging Port on an Electric Scooter?
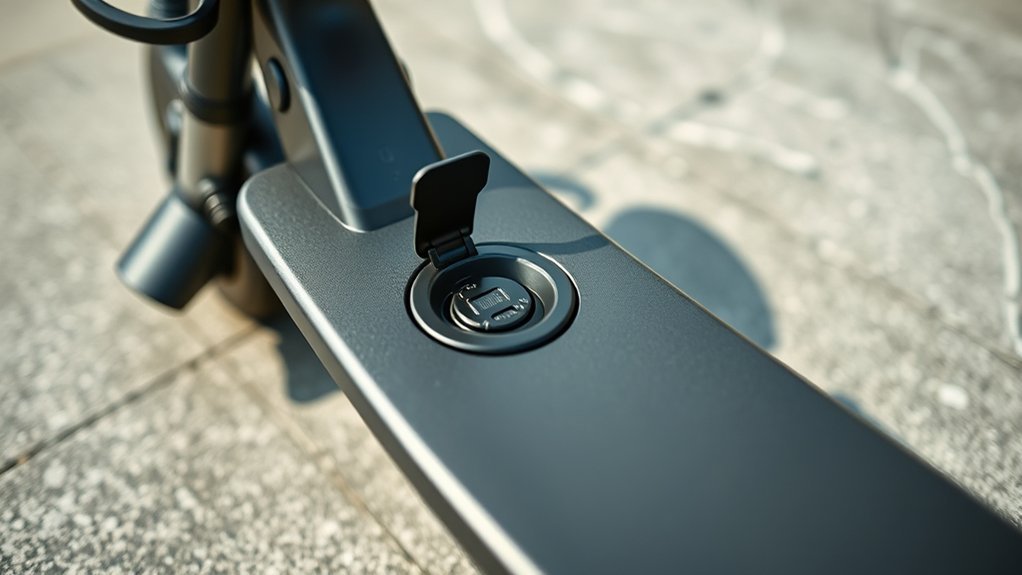
The charging port on an electric scooter is commonly located on the deck, close to the front wheel or stem base, on the lower stem itself, or on a removable battery. A rubber flap, silicone plug, or plastic cap often covers the socket to reduce exposure to dirt and moisture.
Port placement can change even within one brand. For example, Xiaomi says the Mi Electric Scooter 1S has its charging port near the front wheel on the left side of the deck, while the Xiaomi Electric Scooter 4 Pro Plus series places it on the left side of the inclined tube above the body. That is why the model manual is more reliable than a brand-level rule.
If your scooter has a removable battery setup, the charge socket may be on the scooter, the battery pack, or both, depending on the design. Never identify a safe charger only by whether its plug fits. Connector shape, voltage, current, polarity, battery-management requirements, and manufacturer approval all matter.
Pro Tip: Find the scooter’s exact model name or model number before searching online. A manufacturer support page or manual for the exact model is much more dependable than a diagram for a similar-looking scooter.
Common Charging Port Locations on Scooters
You’ll usually find the charging port around the deck, lower stem, side of the frame, or battery compartment. Many designs hide it behind a flexible cover. Do not assume one location applies to every scooter, and do not force open a panel or socket that does not clearly appear to be designed for charging.
Under-Deck Ports
Some electric scooters place the charging port low on the deck or underneath part of the footboard. The socket may sit behind a rubber flap or recessed cover. This position can keep the connector visually unobtrusive, but actual resistance to water, road spray, and impacts depends on the scooter’s enclosure and seal—not simply on where the port is mounted.
- Look along the low-slung deck for a sealed flap or small cap.
- Make sure the charger cable can reach the socket without being sharply bent or resting where it can be stepped on.
- Check that the contact area is dry and free of grit before connecting anything.
- Inspect seams carefully because a color-matched cover may blend into the frame.
If the port is close to the road surface, inspect it regularly. Dirt alone may cause poor contact, while moisture or conductive contamination can increase the risk of corrosion or electrical problems.
Stem-Mounted Ports
Some scooters place the charging port on the lower stem or inclined tube, which can make it easier to reach while the scooter is standing upright. A rubber or plastic cover usually protects the connector when it is not being used.
Do not assume all Xiaomi or Segway models use the same arrangement. Xiaomi’s current support information illustrates the difference clearly: the Mi Electric Scooter 1S uses a deck-side location near the front wheel, while the Electric Scooter 4 Pro Plus series uses a higher position on the inclined tube. Always match the location to your exact model.
A loose, cracked, or missing cover should be replaced with the correct model-specific part. A cover helps limit contamination, but it does not make an otherwise unsealed charging system waterproof.
Battery Compartment Access
Battery-compartment access is another possible charging-port setup, particularly on scooters with removable or enclosed battery systems. You may need to open a purpose-built battery door or remove the battery according to the manufacturer’s instructions before reaching its charging connection.
- Open only the cover or latch identified in the user manual.
- Inspect the gasket, cover, and connector for damage or moisture.
- Insert the approved charger without forcing or twisting the plug.
- When charging is finished, disconnect it as instructed and close the panel or port cover securely.
If a latch does not open easily, stop rather than prying it. Some deck panels are service covers rather than everyday battery-access doors, and opening them can expose electrical components or damage seals.
How to Find the Charging Port Fast
To find the charging port quickly, start with the user manual or official manufacturer support page. Then compare its diagram with the scooter in front of you. Check the deck near the front wheel and stem, the lower stem, the side panels, the underside of the deck, and the battery pack if it is removable.
Do not rely on connector type alone. Circular barrel-style and multi-pin connectors are used across many electrical products, and two plugs that look alike can have different electrical specifications.
Common Port Locations
Most scooters place the charging port in one of a few practical areas. Check them in this order:
- Front or side of the deck: Look near the front wheel and where the deck meets the steering stem. This is a common location on models such as the Xiaomi Mi Electric Scooter 1S.
- Lower stem or inclined tube: Check both sides for a small rubber or plastic cover.
- Battery compartment or removable battery: Follow only the access instructions given by the manufacturer.
- Rear or underside of the deck: Some designs use these locations, so use a flashlight if the socket is difficult to see.
If you still cannot identify the charging point, locate the exact model number and search the manufacturer’s support site. This is safer than guessing or inserting the charger into a similar-looking socket.
Quick Port Search
If you still haven’t spotted the port, work through the scooter systematically. Do not force a rubber cap, hinge, bolt opening, or electrical socket simply because it resembles the charger plug.
| Checkpoint | What you’re looking for |
|---|---|
| Base / deck | Small covered or recessed charging socket |
| Front-wheel area | Deck-side port near the stem |
| Lower stem | Rubber or plastic charging-port cover |
| Battery pack | Model-specific integrated charging connector |
| Manufacturer resources | Exact model diagram or charging instructions |
If the manufacturer no longer provides documentation, an owner forum may help you identify the location, but verify the scooter model, production version, and charger specifications before acting on community advice.
What Charging Port Covers Look Like
Charging-port covers are usually small rubber, silicone, or plastic pieces designed to reduce the amount of dust, road grit, and moisture reaching the connector. They may blend into the deck or frame, so look closely along seams and recessed areas.
A charging-port cover helps limit contamination, but the presence of a cover alone does not mean an electric scooter or charging socket is waterproof.
- Circular caps that sit nearly flush with the surrounding panel
- Oval or rounded covers attached by a flexible hinge
- Rectangular doors bordered by a narrow seam
- Press-fit rubber or silicone plugs that pull out and press back into place
Some scooters also place a charging symbol or other marking beside the cover. When you close the cover, check that it sits evenly and is not being held open by dirt. Replace a cracked, stretched, or missing cover with the correct part for your model.
How to Charge an Electric Scooter Safely
Once you have found the charging port, use the charger supplied with the scooter or a replacement specifically approved by the manufacturer. The U.S. Consumer Product Safety Commission advises consumers to follow the manufacturer’s charging instructions, remain present while charging, never charge while sleeping, and unplug the device when charging is complete.
Warning: Do not use a charger simply because its plug fits. CPSC warns that chargers marketed as “universal” can be electrically incompatible with micromobility batteries and may create a fire hazard. Use only the supplied charger or a replacement confirmed by the scooter manufacturer to work safely with your exact model.
CPSC reported receiving 156 reports of fire or thermal incidents involving “universal” micromobility chargers between January 1, 2023 and May 16, 2024. Its universal-charger safety warning explains why physical plug fit is not enough to establish compatibility.
A charger that fits the socket can still be electrically incompatible. Match the charger to the exact scooter and battery system, not just the connector shape.
| Step | Action | Why it matters |
|---|---|---|
| 1 | Use the supplied or manufacturer-approved charger | Ensures the charger is intended for that battery system |
| 2 | Check that the port, plug, cable, and scooter are dry and undamaged | Reduces electrical and fire risk |
| 3 | Follow the manual’s connection order and charging conditions | Avoids applying a one-size-fits-all procedure to different designs |
| 4 | Stay present and unplug when charging is complete | Follows current CPSC micromobility charging guidance |
Do not charge a scooter while you are sleeping or away from home. If the scooter has just been ridden hard or in hot weather, let the battery return to its permitted charging-temperature range before connecting the charger. Xiaomi, for example, advises allowing some affected models to cool for at least 30 minutes after hot-weather use if battery temperature is too high for charging.
Note: Charger indicator colors are model-specific. Several Xiaomi and Segway models use red for active charging and green when charging has finished, but a green light can also mean the scooter is not accepting a charge under some fault or temperature conditions. Check your own manual before interpreting the LED.
How to Keep the Charging Port Clean and Dry
Keep the charging port clean and dry by checking it for moisture, dust, grit, and damage before charging. A contaminated socket can prevent the plug from seating correctly and may contribute to corrosion or electrical faults.
Inspect the charging port before connecting the charger, keep it dry, and never insert metal tools into the socket.
- Look inside the port for visible water, mud, grit, or bent contacts.
- After a wet ride or cleaning, allow the scooter and charging area to dry fully before plugging it in.
- Remove loose surface debris with a dry, soft brush or other manufacturer-approved cleaning method.
- If the manufacturer permits air cleaning, use only brief, low-pressure dry air and avoid forcing contamination deeper into the connector.
- Close the rubber or plastic cover firmly when the port is not being used.
Do not scrape the contacts with a screwdriver, pin, knife, paper clip, or other metal object. If corrosion, discoloration, melted plastic, a burnt smell, or damaged pins are visible, stop using the port and contact the manufacturer or a qualified repair technician.
Segway’s charging safety information specifically warns users not to charge when the charge port or cable is wet and to keep the port cover closed when the scooter is not charging.
How to Fix Common Charging Port Problems
If your scooter will not charge, start with simple checks that do not require opening the battery compartment or electrically probing a live connector.
- Inspect the charger and cable. Stop using them if you see cuts, exposed wires, bent connectors, melted plastic, or other damage.
- Inspect the charging port. Look for moisture, dirt, bent contacts, a loose socket, cracking, discoloration, or debris that prevents the plug from seating normally.
- Confirm charger compatibility. Check the charger model or specifications against the scooter manufacturer’s documentation rather than assuming a matching plug is sufficient.
- Check temperature conditions. A battery that is too hot or too cold may temporarily refuse to charge. Allow the scooter to return to its specified charging-temperature range.
- Check the indicator according to the manual. Red and green are common on some brands, but their exact meaning is not universal.
- Follow manufacturer troubleshooting. Xiaomi, for example, advises checking the charger connection, looking for a blocked or damaged port, considering battery temperature, and contacting service if the problem remains unresolved.
If the charger works normally but the scooter still does not charge, the fault may involve the charging port, wiring, battery-management system, battery pack, or another internal component. Do not open a lithium-ion battery pack or probe a powered charging port with a multimeter unless you are trained and equipped to service that electrical system.
Warning: Stop charging immediately if you notice unusual heat, swelling, smoke, sparking, melted plastic, a strong chemical or burning smell, or visible battery damage. Move away from the device and follow local emergency guidance if there is an active fire or immediate hazard.
If you find cracked housing, loose terminals, damaged pins, repeated charging failures, or evidence of overheating, contact the scooter manufacturer, an authorized service center, or a qualified technician. Replacing a damaged charging port or working on internal battery wiring is different from routine cleaning and should not be treated as a basic DIY task.
Sources
- U.S. Consumer Product Safety Commission — Micromobility Battery Charging Safety — charging supervision, supplied-charger use, manufacturer instructions, and unplugging when done.
- U.S. Consumer Product Safety Commission — Universal Charger Warning — charger compatibility and reported fire/thermal incidents.
- Xiaomi — Mi Electric Scooter 1S FAQ — verified charging-port location and charger LED behavior.
- Xiaomi — Electric Scooter 4 Pro Plus Charging FAQ — verified tube-mounted charging-port location on that series.
- Segway — Ninebot KickScooter G30LP User Manual — charging-port cover, wet-port warning, and model-specific charger indicator behavior.
Frequently Asked Questions
Where Is the Charging Port on My Electric Scooter?
Check the side or front area of the deck first, especially near the front wheel and stem. Then inspect the lower stem, underside, side panels, and removable battery if fitted. Look for a rubber or plastic cover. For the exact location, use the manual or manufacturer support page for your specific model.
Where Do You Plug in an Electric Scooter?
Plug the manufacturer-approved charging cable into the scooter’s designated charging port. Depending on the model, that port may be on the deck, lower stem, frame, or removable battery. Do not plug a charger into another socket simply because the connector appears to fit.
Where to Plug a Scooter Charger?
Connect it only to the charging port identified for your exact scooter model. The port is commonly hidden behind a small rubber or plastic cover around the deck or lower stem. If you cannot find it, check the manufacturer’s diagram rather than forcing the plug into a similar-looking opening.
Which Port Is Used for Charging?
Use only the scooter’s designated charging socket and the charger supplied or approved by its manufacturer. Electric scooters can use different barrel-style or multi-pin connectors, but connector appearance alone does not establish safe compatibility.
Can I Use Any Scooter Charger if the Plug Fits?
No. A physically fitting plug can still have the wrong voltage, current, polarity, or charging characteristics. CPSC warns against unapproved “universal” micromobility chargers because incompatible chargers can create a fire hazard. Use the original charger or a replacement confirmed by the manufacturer for your exact scooter.
What Should I Do if the Charging Port Is Wet?
Do not connect the charger. Move the scooter to a suitable dry location and allow the port, surrounding area, cable, and scooter to dry fully according to the manufacturer’s instructions. If water entered the battery enclosure or you see damage, stop using the scooter and contact the manufacturer or a qualified technician.
Conclusion
The first places to check for an electric scooter charging port are the deck near the front wheel or stem, the lower stem itself, the underside or side of the deck, and any removable battery pack. Because location changes between models, the exact model manual should be your final reference.
Once you find the port, inspect it for moisture or damage and use only the supplied or manufacturer-approved charger. Do not assume a charger is compatible because its plug fits. Keep the socket clean and covered, remain present while charging, and leave electrical testing or internal battery repairs to qualified service personnel. Those steps make charging safer and help prevent avoidable damage to the scooter and battery.
