
Last Updated on July 26, 2026 by Daniel Globe
The best hiking pole length is the one that lets you stand naturally, plant each tip beside your feet, and keep your elbows bent at about 90 degrees on level ground. A correct starting length can improve control and comfort, but it is not a set-it-and-forget-it measurement. Adjustable poles should be shortened for sustained climbs, lengthened for descents, and fine-tuned for your arm length, footwear, backpack, and walking style.
Quick Answer
On flat ground, set hiking poles so the tips rest beside your feet and your elbows bend about 90 degrees while you hold the grips normally. For long climbs, shorten adjustable poles by roughly 5–10 cm; for descents, lengthen them by 5–10 cm. Comfort and secure pole plants matter more than a chart alone.
Key Takeaways
- Hold trekking poles by the grips, with the tips beside your feet, when checking the neutral length.
- Your elbows should form an angle close to 90 degrees without your shoulders lifting or your back bending forward.
- Shorten both poles about 5–10 cm for long climbs and lengthen them about 5–10 cm for long descents.
- On a side slope, shorten the uphill pole and lengthen the downhill pole as needed.
- A height chart is only a starting point. Arm length, footwear, terrain, pole design, and comfort also affect the best setting.
At a Glance
| Time Required | 5–10 minutes for the initial setup, plus a short trail test |
| Difficulty | Easy |
| Tools Needed | Hiking poles, hiking shoes, and a flat surface |
| Cost | $0 if you already own the poles |
Hiking Pole Length Chart
The following chart is a practical starting point for fixed-length trekking poles. It follows the general fixed-length recommendations published by REI Co-op. Always check the manufacturer’s chart because folding-pole sizes and adjustment ranges vary by model.
| Hiker Height | Suggested Fixed Length | Approximate Inches |
|---|---|---|
| Under 5 ft. 1 in. | 100 cm | 39 in. |
| 5 ft. 1 in. to 5 ft. 7 in. | 110 cm | 43 in. |
| 5 ft. 8 in. to 5 ft. 11 in. | 120 cm | 47 in. |
| 6 ft. and taller | 130 cm | 51 in. |
Note: Height charts are estimates, not universal rules. The LEKI Pole Length Advisor also describes its result as a non-binding recommendation because technique, footwear, body proportions, and personal needs differ.
If you are taller than about 6 feet, confirm that an adjustable model reaches at least approximately 130 cm or 51 inches. You should also make sure it can become short enough for climbs. A pole that reaches your neutral setting but has no remaining adjustment in either direction may be a poor choice for steep terrain.
Factors to Consider When Choosing Hiking Pole Length
Your height provides a useful starting point, but it does not determine the perfect setting by itself. Consider the following factors together:
- Arm length: Two people of the same height can have different forearm and upper-arm proportions. The person with longer arms may prefer a slightly different setting.
- Hiking shoes: Thick soles add height. Measure while wearing the footwear you normally use on the trail.
- Backpack load: A loaded pack can change your posture and balance. Test the poles while wearing your usual day pack or backpacking pack.
- Terrain: Level ground, climbs, descents, and side slopes require different pole positions.
- Pole design: Fixed-length poles provide no terrain adjustment. Folding models may be fixed or offer only a small adjustment range.
- Comfort and mobility: Shoulder, wrist, elbow, or back limitations may affect the most comfortable setting.
The goal is a relaxed posture. Your shoulders should remain down, your wrists should stay close to neutral, and you should not need to reach far forward to place the tips.
Understanding the Different Types of Hiking Poles

Hiking poles are available in several designs. These categories can overlap, so a folding pole may also provide a small amount of length adjustment.
Products Worth Considering
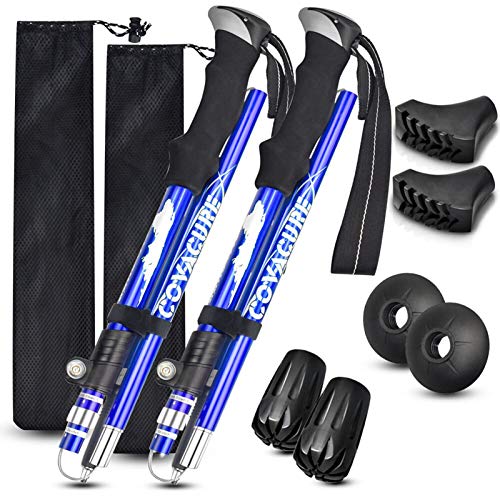
【Upgraded Tri-fold Design】 - Covacure Hiking poles provids telescopic and foldable tri-fold design. You can freely adjust the lenght from 43" to 51" (110-130cm) to fit your height comfortably after easy installing. What's more, they can folding down less than 14"/35.5cm to store in your backpack, luggage, or duffel bags.

Pack-and-Go: Extends to 51.2" (130 cm), collapses to 25.6" (65 cm), and disassembles to 21.46" (54.5 cm). When separated into three sections, they fit diagonally in most 22"+ suitcases. For air travelers, check your luggage’s interior length before ordering to meet airline baggage rules. For outdoor hikers, we recommend secure poles externally using backpack loops or straps

【Upgraded Tri-fold Trekking Poles】 Covacure Hiking poles provids telescopic and foldable tri-fold design. So that you can freely adjust the lenght from 39.4"/100cm to 47.2"/120cm to fit your height comfortably after easy installing. What's more, they are easy to be folding down less than 14"/35.5cm to store in your backpack, luggage cases, or duffel bags.
Adjustable Telescoping Poles
Adjustable poles use two or three sliding shaft sections. External lever locks or twist locks hold the selected length. They are a strong choice for general hiking because you can change the setting for climbs, descents, and traverses.
Fixed-Length Poles
Fixed-length poles have a single usable length once assembled. They tend to have fewer adjustment parts and may feel light and simple. However, you must select the correct size before buying, and you cannot lengthen or shorten them for changing slopes.
Folding Poles
Folding poles break into connected sections for compact storage. Some open to one fixed length, while others include a short telescoping section. Check both the stated size and the usable adjustment range rather than assuming every folding pole is fully adjustable.
Shock-Absorbing Poles
Some poles include an internal spring or damping system. This feature can soften the feel of pole plants, especially on descents, but it does not correct a poor length setting. A pole that is too long or too short can still place the shoulders, wrists, or back in an uncomfortable position.
How to Measure for the Correct Hiking Pole Length
Use the following process on a flat, firm surface:
- Put on your hiking shoes. Wear the shoes or boots you normally use so the sole height is included.
- Stand upright. Keep your shoulders relaxed, your back neutral, and your arms beside your body.
- Hold the pole normally. Grip the handle with the tip touching the floor beside your foot. Do not turn the trekking pole upside down.
- Adjust the shaft. Lengthen or shorten the pole until your forearm is roughly parallel with the floor and your elbow forms an angle close to 90 degrees.
- Check both sides. Set both poles to the same neutral length, secure the locks, and take several natural steps.
A small variation from 90 degrees is normal. The angle is a starting point, not a medical measurement. Your shoulders should not rise toward your ears, and you should not need to bend forward to reach the grips.
Pro Tip: Mark or remember your neutral setting after testing it. This gives you a reliable baseline when you shorten the poles for a climb or lengthen them for a descent.
Products Worth Considering

Exceptional Quality and Comfort - Crafted from aircraft-grade 6061 aluminum, each 10-ounce trekking pole is highly durable in all conditions.

Natural Cork Grip Handle: Cork grips naturally absorb hand moisture to keep your grip dry on long hikes. Note: cork grips have a slight rotational flex; this is an anti-torque ergonomic feature, not a defect. Paired with lightweight aluminum shafts and EVA foam lower grips for stability on rugged terrain. Trekking poles must be checked in as luggage (not carry-on) per TSA and most airline rules. Set of 2 with carry bag included.
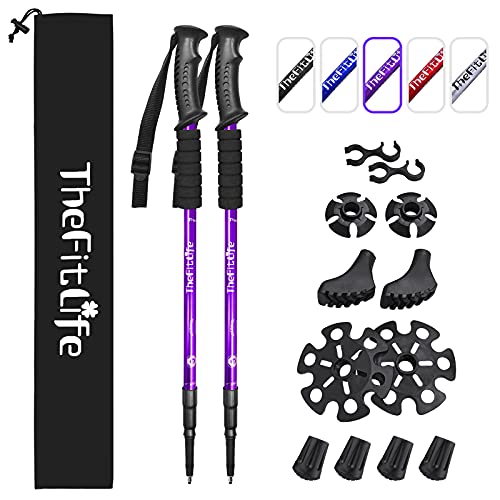
Pack-and-Go: Extends to 51.2" (130 cm), collapses to 25.6" (65 cm), and disassembles to 21.46" (54.5 cm). When separated into three sections, they fit diagonally in most 22"+ suitcases. For air travelers, check your luggage’s interior length before ordering to meet airline baggage rules. For outdoor hikers, we recommend secure poles externally using backpack loops or straps
How to Set Multi-Section Poles
Follow the manufacturer’s instructions for distributing length between shaft sections. On many three-section poles, keeping an upper adjustment near the middle of its range makes on-trail changes easier. Never extend a section past its printed stop or maximum-extension mark.
After setting the length, close every lock firmly and press down on each pole before leaving the trailhead. Locking mechanisms can loosen with use, dirt, or temperature changes.
How to Adjust the Wrist Straps
For a conventional trekking-pole strap, place your hand upward through the bottom of the loop and then bring it down onto the grip. Adjust the strap so it supports the heel of your hand without cutting into your wrist. This lets you hold the grip more lightly instead of squeezing it throughout the hike.
Finding the Right Length for Uphill and Downhill Hiking
Uphill Hiking
For a long or steep climb, shorten both poles by approximately 5–10 cm from your neutral setting. Shorter poles make it easier to plant the tips higher on the slope without lifting your shoulders. The steeper the climb, the more adjustment you may need within the pole’s safe range.
If a climb is brief, you may not need to stop and change the shafts. Poles with extended foam grips let you move your hands lower on the pole temporarily.
Downhill Hiking
For a sustained descent, lengthen both poles by approximately 5–10 cm. The added reach helps you plant the tips lower on the trail while keeping your torso more upright. Do not lengthen them so much that you lock your elbows, lean backward, or place the tips far ahead of your feet.
Side Slopes and Traverses
When crossing a slope for an extended distance, the ground is higher on one side of your body. Shorten the uphill pole and lengthen the downhill pole until both hands feel balanced. Return them to equal lengths when the trail levels out.
Warning: Do not use an adjustable pole with a loose lock or a shaft extended beyond the manufacturer’s limit. A section that slips or separates while bearing weight can cause a sudden loss of balance.
Adjusting Hiking Pole Length for Different Terrains
Slope is usually more important than surface type when choosing pole length. However, the ground conditions affect where and how you plant each tip.
Flat and Rolling Trails
Use your neutral 90-degree setting on level or gently rolling ground. The tips should land close to your feet as your opposite leg moves forward. Avoid reaching far ahead with every plant because this can interrupt your stride and load your shoulders unnecessarily.
Rocky or Root-Covered Trails
Keep the poles near their neutral setting unless the trail is also climbing or descending. Focus on short, controlled plants between obstacles. If you constantly reach over rocks, move your hands on extended grips or make a small adjustment rather than assuming all rocky ground requires shorter poles.
Mud, Snow, and Soft Ground
The visible shaft length does not need to change merely because the surface is soft. However, the tips may sink below the surface, so larger mud or snow baskets can help prevent deep penetration. Test each plant before placing substantial weight on it.
Dense Vegetation
A longer pole is not automatically better in brush. Excessive length may catch branches or force wide arm movements. Use the normal slope-based setting and keep the tips close to your walking line.
Exposed and Windy Trails
On open coastal paths or ridges, keep your hands close to your body and use secure, compact pole plants. Poles can provide extra contact points, but they should not be treated as anchors against strong wind. Lower your body position, slow down, and turn back when conditions become unsafe.
The Impact of Hiking Pole Length on Body Mechanics
A suitable pole length allows your arms to swing without shrugging your shoulders or bending your torso. This can make pole plants more repeatable and may help you share some work between your upper and lower body.
The physical effects of trekking poles are not identical in every situation. A small laboratory study of eight men walking down a 25-degree ramp found reductions of approximately 12–25% in several measured forces and knee-loading variables when poles were used. A later study involving level walking found that increasing force through the poles did not reduce estimated knee compression. A broader review concluded that poles can reduce some lower-extremity loading while increasing cardiovascular demand.
These findings mean that poles may be especially useful for stability, descents, and hiking with a load, but they should not be described as guaranteed protection from knee pain or injury.
Correct pole length supports stable, repeatable pole plants. It does not guarantee injury prevention or eliminate stress on the knees, hips, shoulders, or wrists.
Choosing the Right Length for Your Height and Arm Length
Height charts work well for narrowing the choices, especially when buying fixed-length poles online. Your final decision should still be based on the position of your hands, elbows, and shoulders.
If you have relatively long arms, a chart recommendation may feel slightly high or low compared with the 90-degree test. If the chart and your actual fit disagree, prioritize a comfortable grip position and follow the pole manufacturer’s sizing instructions.
Products Worth Considering

BUILT TO LAST: Whether you're hiking on rugged terrain or snowshoeing on fresh powder, you need hiking gear that can keep up! Trailbuddy trekking poles are built tough enough for the long haul.

Compact & Portable - Our foldable hiking poles collapse down to 15 inches, fitting easily into any bag. These collapsible walking sticks for hiking are perfect for travel, offering lightweight portability for any outdoor adventure.

SUPER COMFORTABLE:EVA Foam Handle with wrist strap, sweat-absorbent, skid resistance groove design,and super comfortable for long time use.International Standard Length of 49" long, and 13.4" when folded, fitting perfectly in your backpack
What to Do When You Are Between Fixed Sizes
Try both sizes whenever possible. Walk on level ground and test a short climb and descent. Choose the size that allows relaxed shoulders, controlled plants, and a natural stride.
For general trekking, adjustable poles are often the safer purchase when you are between fixed sizes. A limited-adjustment folding pole can also work if your neutral setting sits near the middle of its stated range.
Signs the Poles Are Too Long
- Your shoulders rise with each pole plant.
- Your elbows remain tightly bent beyond approximately 90 degrees.
- The tips land too far in front of you.
- You feel pressure in your shoulders, neck, or upper back.
- You struggle to swing the poles without lifting your hands.
Signs the Poles Are Too Short
- You bend forward to reach the grips.
- Your arms become nearly straight at the bottom of each plant.
- The poles provide little useful contact on descents.
- You feel excessive pressure in your hands from leaning down onto the grips.
- Your stride becomes short or awkward while trying to keep the tips engaged.
Tips for Testing Hiking Pole Length on the Trail
A living-room test confirms the basic fit, but a short trail test reveals whether the setting works while you are moving.
- Begin on level ground at the neutral setting.
- Walk naturally for several minutes without deliberately changing your stride.
- Check whether the tips land beside or slightly behind the opposite foot.
- Climb a sustained hill and shorten both poles by about 5–10 cm.
- Descend the same hill and lengthen them by about 5–10 cm from neutral.
- Cross a side slope and test different uphill and downhill pole lengths.
- Repeat the test while wearing your normal backpack.
Pay attention to your shoulders, wrists, elbows, neck, and lower back. Mild unfamiliarity is normal for a new user, but persistent pain, numbness, or joint discomfort is a reason to stop and reassess the setup.
Note: Trekking poles and hiking staffs are recreational outdoor equipment. They are not a replacement for a cane, crutch, or other mobility aid recommended by a qualified healthcare professional.
Common Hiking Pole Length Problems
The Pole Becomes Shorter While Walking
Stop using it until you tighten or clean the locking mechanism according to the manufacturer’s instructions. Dirt, worn parts, or insufficient lever tension can allow a shaft to slip.
One Shoulder Feels Higher Than the Other
Confirm that both poles have the same measurement on level ground. Also check whether one shaft section has slipped. Different lengths are useful on a side slope but can feel uneven on flat terrain.
Your Wrists or Hands Become Sore
Loosen your grip and let properly adjusted straps support the heel of your hands. Check that the poles are not too short, which may encourage you to push downward continuously. Stop using the straps if they create numbness or restrict circulation.
The Tips Keep Landing Far Ahead
The poles may be too long, or you may be reaching rather than swinging naturally. Shorten them slightly and aim for compact plants near your feet.
The Poles Feel Useless on a Descent
They may still be at the neutral or uphill setting. Lengthen both poles gradually, while keeping a soft bend in your elbows and avoiding plants that are too far forward.
The Benefits of Using the Correct Hiking Pole Length
Correctly fitted hiking poles can provide several practical benefits:
- More consistent contact with uneven ground
- A more relaxed shoulder and wrist position
- Better control during climbs, descents, stream crossings, and side slopes
- Less need to bend or reach for each pole plant
- A steadier rhythm when hiking with a backpack
- More effective use of the poles for balance and propulsion
These benefits depend on technique and trail conditions. Using poles also involves the arms and upper body, so it may increase total effort even when the legs feel more supported.
The Potential Risks of Using Incorrect Hiking Pole Length
Poles that are too long can lift the shoulders, shorten the arm swing, and encourage overreaching. Poles that are too short can cause forward bending and may provide too little reach on descents.
An unsuitable setting can also make the tips land in poor positions. A pole planted too far forward may slide, catch between rocks, or interrupt your stride. A loose adjustment lock creates a separate risk because the shaft can collapse when loaded.
No pole setting can make every surface safe. Test each plant on loose rock, mud, snow, wet roots, and streambeds before relying on it. Slow down when secure placement is uncertain.
Good pole fit works best with suitable footwear. For additional wet-weather footwear ideas, see this guide to waterproof sneakers for travel.
Frequently Asked Questions
What are hiking poles?
Hiking poles, also called trekking poles, are lightweight poles used in pairs to provide extra contact points with the ground. A hiking staff is usually a single pole and is often used on easier terrain or with a lighter load.
Why are hiking poles useful?
They can improve stability, provide support on uneven ground, and help hikers maintain a steady rhythm. They may also redistribute some work to the upper body, especially during descents or while carrying a backpack.
How long should my hiking poles be?
On level ground, set them so the tips rest beside your feet and your elbows bend at approximately 90 degrees while you hold the grips normally. Your shoulders should remain relaxed and your back should stay upright.
How do I measure the correct trekking pole length?
Wear your hiking shoes, stand on a flat surface, hold the pole by its grip, and place the tip beside your foot. Adjust the shaft until your forearm is close to level and your elbow forms an angle near 90 degrees.
Should hiking poles be different lengths on different terrain?
Yes. Shorten both poles by roughly 5–10 cm for sustained climbs and lengthen them by roughly 5–10 cm for sustained descents. On a side slope, shorten the uphill pole and lengthen the downhill pole.
Can all hiking poles be adjusted?
No. Telescoping poles usually offer a broad adjustment range. Some folding poles provide limited adjustment, while fixed-length folding poles open to only one usable length. Check the model specifications before buying.
Should I choose the longer or shorter pole when I am between fixed sizes?
Test both sizes while wearing your hiking shoes. Choose the one that keeps your shoulders relaxed and your elbows near 90 degrees without forcing you to bend or reach. An adjustable model is usually easier to fit when you fall between fixed sizes.
Is one hiking pole enough?
A single staff can provide support on easier terrain, but a pair offers balanced contact on both sides and is generally more useful for backpacking, long descents, and uneven trails.
Sources
- REI Co-op: How to Choose Trekking Poles and Hiking Staffs — sizing chart, 90-degree fitting method, terrain adjustments, locks, straps, and pole types
- LEKI Pole Length Advisor — manufacturer sizing guidance and the need for individual adjustment
- Knee Joint Forces During Downhill Walking With Hiking Poles — laboratory findings on downhill knee-loading measures
- Knee Compression Force During Level Walking With Hiking Poles — evidence that level-ground effects differ from downhill findings
- Are Trekking Poles Helping or Hindering Your Hiking Experience? A Review — review of biomechanical and physiological benefits and limitations
